
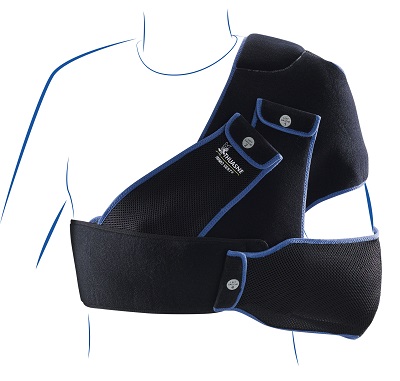


Immo Vest
Features & benefits
- 3 strap action analgesic immobilization of the shoulder, upper arm and forearm.
- High coverage vest for better protection during daily use
- Breathable fabric, shoulder padding & anatomical form for extra comfort
- Numbered, colour-coded fitting systing for easy fit.
- Reversible right/left model
Indications
- Uncomplicated shoulder injuries :
- anterior dislocation of the shoulder,
- non-displaced, non-articular fracture of the scapula,
- uncomplicated acromioclavicular dislocation (“separated shoulder”).
- Immobilisation of the elbow following dislocation.
- Fractures of the greater tuberosity of the humerus, humeral head or lesser tuberosity of the humerus (non-surgical indications).
- Immobilisation following surgery to correct instability.
- Rotator cuff rupture in the acute phase.
- Acute scapulohumeral periarthritis (“frozen shoulder”).
- Paralysis of the brachial plexus.
- Re-education of the scapulohumeral joint.
- Pain-relieving immobilisation of the shoulder after the inflammatory phase (acute rheumatism, rheumatoid arthritis).
Sizing guide

Fitting & user guide
8-STEP FITTING INSTRUCTIONS :
To make fitting easier, carefully follow the numbers indicated on the straps and the grey or black colours.
For the left shoulder :
STEP 1: Lay the product flat with the grey seam of the fleecy pad visible upwards.
STEP 2: Fold the ends of the 5 straps back on themselves to cover the black Velcro surfaces.
STEP 3: Attach the grey Velcro surface of the LEFT 1 strap the other LEFT 1mark.
STEP 4: Place the fleecy pad on the shoulder, with the grey seam visible on the outside.
STEP 5: Bend the arm at right angles over the vest. Support it by raising the lower part (as indicated by the arrow).
Fasten this strap at the shoulder.
STEP 6: Bring the LEFT 2 strap round to the front and fasten in two places (according to the 2 arrows in the
diagram).
STEP 7: Take the LEFT 4 strap and fold it over the forearm to hold the elbow in place.
STEP 8: Grasp the LEFT 1strap prepared in STEP 3, take it round to the front of the body and attach above
the elbow.
For the right shoulder :
STEP 1: Lay the product flat with the black seam of the fleecy pad visible upwards.
STEP 2: Fold the ends of the 5 straps back on themselves to cover the grey Velcro surfaces.
STEP 3: Attach the black Velcro surface of the RIGHT 1 strap the other RIGHT 1 mark.
STEP 4: Place the fleecy pad on the shoulder, with the black seam visible on the outside.
STEP 5: Bend the arm at right angles over the vest. Support it by raising the lower part (as indicated by the arrow).
Fasten this strap at the shoulder.
STEP 6: Bring the RIGHT 2 strap round to the front and fasten in two places (according to the 2 arrows in the
diagram).
STEP 7: Take the RIGHT 4 strap and fold it over the forearm to hold the elbow in place.
STEP 8: Grasp the RIGHT 1strap prepared in STEP 3, take it round to the front of the body and attach above
the elbow.

Do not hesitate to readjust the vest several times for perfect immobilisation.
Care instructions
- Wash only with soapy water, without detergent or bleach.
- Squeeze out excess water.
- Dry flat away from heat sources.